Baby Sweater Crochet
SIZE: 0-6 months (12-18 months, 2-3 years, 4 years)
Finished Chest 20 (21, 23, 25) in. (51 (53.5, 58.5, 63.5) cm)
Finished Length 9 1/2 (10, 11, 12) in. (24 (25.5, 28, 30.5) cm)
MATERIALS :
2 2, 3, 3 Balls
• Lion Brand
Crochet Hook - Size I-9
• Large-Eye Blunt Needles (Set of 6)
•
Additional Materials
4 buttons, 3/4 in. (19 mm) diameter
GAUGE:
14 hdc + 9 rows = 4 in. (10 cm). BE SURE TO CHECK YOUR GAUGE. When you match the gauge in a
pattern, your project will be the size specified in the pattern and the materials specified in the pattern
will be sufficient. If it takes you fewer stitches and rows to make a 4 in. [10 cm] square, try using a
smaller size hook or needles; if more stitches and rows, try a larger size hook or needles.
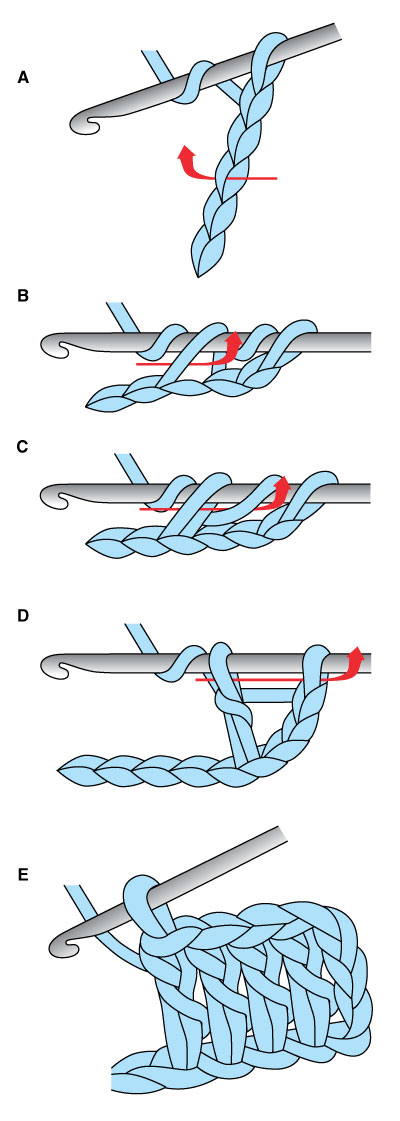
STITCH EXPLANATION:
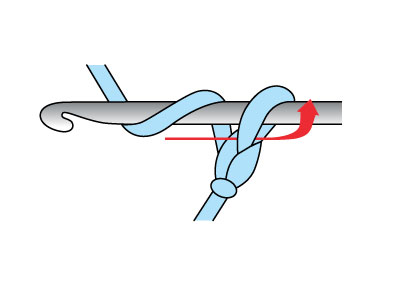
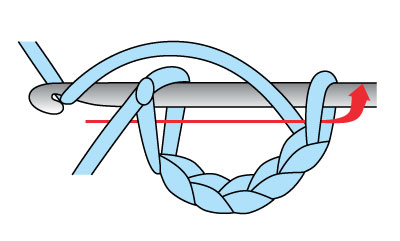
hdc2tog (hdc 2 sts together) Yarn over, insert hook into st and draw up a loop.
Yarn over, insert
hook into next st and draw up a loop. Yarn over and draw through all 5 loops on hook - 1 st decreased.
BACK
Ch 38 (40, 43, 45).
Row 1: Hdc in 3rd ch from hook and in each ch across - 36 (38,
41, 43) hdc at the end of this row.
Row 2: Ch 2 (does not count as a st), turn, hdc in each st across.
Rep Row 2 until piece measures 4 1/2 (5, 5 1/2, 6) in. (11.5 (13,
14, 15) cm) from beg.
Shape Raglan Armholes
Next Row: Ch 2, turn, hdc2tog, hdc in each st across to last 2 sts,
hdc2tog - 34 (36, 39, 41) hdc at the end of this row.
Rep last row until 10 (12, 13, 13) sts rem.
Fasten off.
LEFT FRONT
Ch 21 (22, 23, 24).
Row 1: Hdc in 3rd ch from hook and in each ch across - 19 (20,
21, 22) hdc at the end of this row.
Row 2: Ch 2 (does not count as a st), turn, hdc in each st across.
Rep Row 2 until piece measures 4 1/2 (5, 5 1/2, 6) in. (11.5 (13,
14, 15) cm) from beg.
Shape Raglan Armhole
Next Row (RS): Ch 2, turn, hdc2tog, hdc in each st across - 18
(19, 20, 21) hdc at the end of this row.
Next Row: Ch 2, turn, hdc in each st across to last 2 sts, hdc2tog
- 17 (18, 19, 20) hdc.
Rep last 2 rows until 6 (7, 7, 7) sts rem.
Fasten off.
RIGHT FRONT
Ch 21 (22, 23, 24).
Row 1: Hdc in 3rd ch from hook and in each ch across - 19 (20,
21, 22) hdc at the end of this row.
Row 2: Ch 2 (does not count as a st), turn, hdc in each st across.
Rep Row 2 until piece measures 4 1/2 (5, 5 1/2, 6) in. (11.5 (13,
14, 15) cm) from beg.
Shape Raglan Armhole
Next Row (RS): Ch 2, turn, hdc in each st across to last 2 sts,
hdc2tog - 18 (19, 20, 21 hdc.
Next Row: Ch 2, turn, hdc2tog, hdc in each st across - 17 (18,
19, 20) hdc at the end of this row.
Rep last 2 rows until 6 (7, 7, 7) sts rem.
Fasten off.
SLEEVE (make 2)
Ch 32 (32, 34, 36).
Row 1: Hdc in 3rd ch from hook and in each ch across - 30 (30,
32, 34) hdc at the end of this row.
Row 2: Ch 2 (does not count as a st), turn, hdc in each st across.
Rep Row 2 until piece measures 3 (3 1/2, 3 1/2, 4) in. (7.5 (9, 9,
10) cm) from beg.
Shape Raglan Armhole
Next Row: Ch 2, turn, hdc2tog, hdc in each st across to last 2 sts,
hdc2tog - 28 (28, 30, 32) hdc at the end of this row.
Rep last row until 4 sts rem.
Fasten off.
FINISHING
Sew raglan edges of Sleeves to raglan edges of Back and Fronts.
Sew side and Sleeve seams.
Collar
From RS, join yarn with sl st in corner of Right Front neck.
Row 1: Ch 2, work hdc evenly spaced across entire neck edge to Left Front corner.
Row 2: Ch 2, turn, hdc in each st across.
Rep last row until collar measures about 2 1/4 (2 1/4, 2 1/2, 3 1/4) in. (5.5 (5.5, 6.5, 8.5) cm) from beg.
Fasten off.
On Left Front mark positions for 4 buttons.
First should be at Row 1 of collar, remaining buttons should be about 3
1/2 in. (9 cm) apart.
Edging
From RS, join yarn with sl st in lower corner of Right Front.
Row 1: Ch 1, work sc evenly spaced up Right Front, around collar and down Left Front, working a ch 5 button loop
opposite each button mark.
Fasten off.
Sew buttons to Left Front opposite button loops.
Weave in ends.
ABBREVIATIONS
beg = begin(s)(ning)
ch(s) = chain(s)
hdc = half double crochet
rem = remain(s)(ing)
rep = repeat(s)(ing)
RS = right side
sc = single crochet
sl st = slip stitch
st(s) = stitch(es)
BABY SWEATER CROCHET 2
Base of ch. Work in first stitch
ch3 counts as first dc
Size to fit approx: 20 Inch chest, 6 – 12 month baby
4.50mm crochet hook, 5 Buttons
GAUGE – 5dc & 3 rows measures approx 1 inch
Worked in one piece, starting with yoke.
ch56, 1dc in 4th ch from hook, 1dc in next 6ch, (front), 3dc in next ch, 1dc in next 8ch, (sleeve), 3dc in next ch, 1dc in next 18ch, (back), 3dc in next ch, 1dc in next 8ch, (sleeve), 3dc in next ch, 1dc in next 8ch, (front). Turn (61dc + ch3).
2nd Row – (Inc) ch1, 1sc in base of ch1, * 1trc in next dc, 1sc in next dc, * rpt from * to * to
centre dc on 3dc group, (front) 3dc in dc
rpt from * to * to centre dc on next 3dc group, (sleeve) 3dc in dc
rpt from * to * to centre dc on next 3dc group, (back) 3dc in dc
rpt from * to * to centre dc on next 3dc group, (sleeve) 3dc in dc
1sc in next dc, rpt from * to * to end, working last sc in top of ch3. (front) Turn. (28trc)
3rd Row – (Inc) ch3, * 1dc in each st to 3dc group, 1dc in next dc, 3dc in centre dc on 3dc group, * rpt from * to * to last 3dc group, 1dc in next dc, 3dc in centre dc on 3dc group, 1dc in each st to end. Turn. (77dc + ch3)
Rpt 2nd & 3rd Rows four more times or until 141dc + ch3 remain.
Shape Armholes – ch1, 1sc in base of ch1, * 1trc in next dc, 1sc in next dc, * rpt from * to * across first front to centre dc on 3dc group, 2sc in dc, skip 30dc, (sleeve) 2sc in next dc, rpt from * to * across back to centre dc on next 3dc group, 2sc in dc, skip 30dc, (sleeve) 1sc in each of next 2dc, rpt from * to * to end. Turn. (38trc)
Pattern Row 1 – ch3, 1dc in each stitch to end. Turn. (84dc + ch3)
Pattern Row 2 – ch1, 1sc in base of ch1, * 1trc in next dc, 1sc in next dc, * rpt from * to * to end, working last sc in top of ch3. Turn. (42trc)
Rpt Pattern Rows 1 & 2 six more times until you have 13trc rows worked in all from beginning. Turn.
Next Row – ch1, 1sc in base of ch1, 1sc in each stitch to end. Turn.
Rpt last row twice. DNT after the last row.
Button/Buttonhole Bands – With RS of work facing, working along right hand front edge, work 41sc evenly in row ends along first front edge, 3sc in corner, work 1sc in each ch around neck, 3sc in corner, work 41sc evenly in row ends down second front edge. Turn.
Button Band – ch1, 1sc in base of ch1, work 1sc in each sc to corner. Turn.
Rpt last row once. Fasten off.
Buttonhole Band – Return to opposite front edge, with WS facing and working from neck
downwards, rejoin yarn to first sc, ch1, 1sc in base of ch1, * ch2, skip 1sc, 1sc in each of next 8sc, * rpt from * to * 3 more times, ch2, skip 1sc, 1sc in remaining sc. Turn. (5 Buttonholes made)
Next Row – ch1, 1sc in base of ch1, 1sc in each sc and ch2 space to end.
Fasten off.
Sleeves x 2 – With WS facing, rejoin yarn to first dc underarm were you divided for the
armholes, ch3, 1sc in next dc, * 1trc in next dc, 1sc in next dc, * rpt from * to * across the 30dc for sleeve to end, sl st to top of ch3 on beginning of row to make a round. Turn. (14trc)
Row 2 – ch3, 1dc in each st to end, sl st to top of ch3 on beginning of row. Turn. (29dc + ch3)
Row 3 – ch3, 1sc in next dc, * 1trc in next dc, 1sc in next dc, * rpt from * to * to end, sl st to top of ch3 on beginning of row. Turn.
Rpt Rows 2 & 3 five more times. Turn.
Cuff – ch1, 1sc in base of ch, 1sc in next 2st, * dec 1sc (see abbrev) over next 2st, 1sc in each of next 3st, * rpt from * to * to last 2st, dec 1sc over the 2st’s, sl st to first sc on beginning of row. Turn. (24sc)
Next Row – ch1, 1sc in base of ch1, 1sc in each sc to end, sl st to first sc on beginning of row. Turn.
Rpt last row once.
Finishing – Close small gaps under arms, weave in any loose ends of yarn, sew on buttons to correspond with the buttonholes.
Have lots of fun making this knobbly baby cardi and can you please pin it to your Pinterest boards so others will get to see it.
AbbreviationsWS. Wrong Side
RS. Right Side
st. Stitch(es)
ch. Chain
sc. Single Crochet
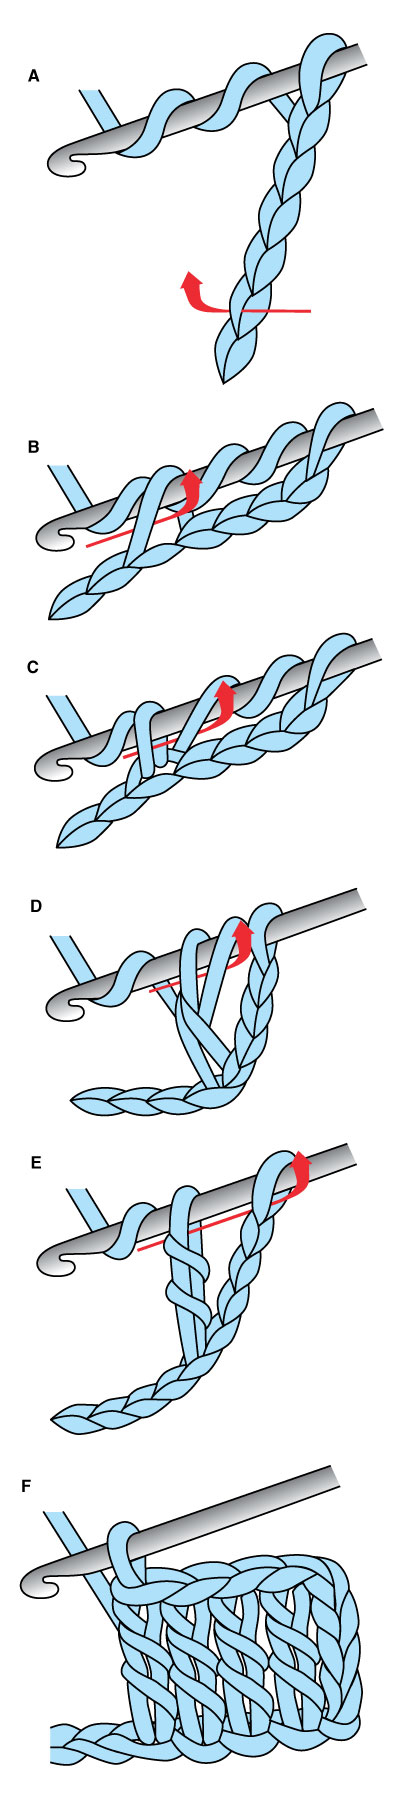
dc. Double Crochet
trc. Treble Crochet
rpt. Repeat
sl st. Slip Stitch
yo. Yarn Over
DNT. Do Not Turn
dec. Decrease
Pull up loop from each of next 2st, yo, pull through all loops