Crosetam si tricotam pentru incepatori si nu numai.

Crosetam si tricotam hainute pentru copiii nostri.
Aici veti gasi diferite modele explicate atat in limba romana cat si in limba engleza.
Daca intampinati greutati nu ezitati sa ma contactati

luni, 13 noiembrie 2017

Pulover Baieti, Boy Sweater Knitting


Using DK yarn and 3 mm needles ~
This raglan sweater for babies is knit from the top down and is entirely seamless
Size
Fits babies about 2 years.

Gauge
24 sts and 36 rows = 4" with larger needles over pattern stitch


Materials
1 ball sportweight yarn such as Bernat Softee Baby
Size 3.25 mm straight needles (circular needles),(double points)
2 stitch holders
stitch markers
tapestry needle

Instructions
Work Back and forth:

Pattern:
Row 1 (Right side): p1 * knit 1, purl 2; repeat from * to end.
Row 2: Knit 1, * slip 1 with yarn in front, knit 2; repeat from * to end.


Cast on 84 sts.
Beginning at collar, with straight needles CO 88 sts. 
Rows 1 : *k1, p1*; rep from * to end.
Rows 2 : *p1, k1; rep from * to end.
Repeat Rows 1 and 2 more times,

Next Row (RS): Rep Row 1, working a buttonhole in band at beginning of row for boys (k2, yo, k2tog, k1) or at end for girls (k1, k2tog, yo, k2). Work buttonholes every 12th ridge or 24 rows.

Next row (WS): Beginning Pattern and placing markers as follows: 
Work 14 sts for front, pm,1 st, pm, work 14 sts for sleeve, pm, 1 st, pm, work 28 sts for back, pm, 1 st, pm, work 14 sts for sleeve, pm, 1 st, pm, work last 14 sts for front.
Change to circular needles, working back and forth as if with straights. 
Begin yoke and raglan increases. Increase by knitting into the front and back of same stitch.

On the back of the work, we were working row 2 in the pattern without making increases between markers.

Next row (RS): Front, sl1, p1 * knit 1, purl 2*; repeat from * to marker, inc 1 st, marker, K 1, slip marker, inc 1 st; Sleeve: rep from * to marker, inc 1 st, marker, K 1, slip marker, inc 1 st,  Back : rep from * to marker, inc 1 st, marker, K 1, slip marker, inc 1 st; Sleeve rep from * to marker, inc 1 st, marker, K 1, slip marker, inc 1 st; Front , rep from * to end. (96 sts).

Rep last four rows for pattern stitch until you have 54 sts for each sleeve (20 ridges ), ending with WS completed-592 sts total.

Join body and put sleeves on holder.
(RS): *Work to within 2 sts of marker, inc in next st, K1, remove marker. Put 54 sts of sleeve on holder without working. CO 4 sts at underarm. Remove next marker, inc in next st; rep from * once and complete row - 136 sts
Work even, continuing in pattern stitch and repeating buttonholes at the proper interval. End with 3rd row of pattern stitch, 8 ridges below the 4th buttonhole.

Bottom Band
Change to smaller straight needles.
WS: K5, *p2, k2; rep from 8 to last 5 sts, k5
Continue in ribbing and working buttonbands as for collar, knitting 5th buttonhole at proper interval.
Work 4 rows after buttonhole, then BO loosely in pattern.
Sleeves
With larger double points, k 42 sts from holder and pick up 6 sts from underarm (the 4 CO sts, plus an extra st at each end of CO sts). Divide 15 sts on needle 1, 18 sts on needle 2, 15 sts on needle 3 - 48 sts
Begin at underarm, dec and join:
Rnd 1: K5, k2tog, k to the last st, K it together with the 1st stitch from the beginning of next round - 46 sts
Rnd 2: K
Rnd 3: K
Rnd 4: P
Rnd 5: K4, k2tog, k to the last st, K it together with the 1st stitch from the beginning of next round - 44 sts
Rnd 6: K
Rnd 7: K
Rnd 8: P
Rnd 9: K3, k2tog, k to the last st, K it together with the 1st stitch from the beginning of next round - 42 sts
Work even over 42 sts as established in pattern stitch until sleeve measures 4" or desired length. End with p rnd completed.
*K2tog, k5; rep from * around - 36 sts
Change to smaller double points and work in k2, p2 ribbing for one inch. BO loosely.
Rep for second sleeve.

Sew on buttons. Weave in ends on WS.


joi, 26 octombrie 2017

Caciula Crosetata

Crochet Puff Stitch Hat


ABBREVIATIONS

Ch – Chain
Pf – Puff Stitch **See stitch description
Sc – Single Crochet
Slst – Slip Stitch
Sts – Stitches
Stitch Description:

Pf –  YO, Insert hook into designated stitch, YO and pull up a loop. Insert hook into same stitch, YO and pull up a loop. Insert hook into same stitch, YO and pull up a loop (7 loops on hook). YO and pull through all 7 loops. Chain 1.
Teen/Adult Small:

Round 1: Ch 3 and join to form a ring. Make 6 Pf stitches in center of ring. Join with the top two loops of the first puff stitch with a slst.

Round 2: Make 2 pf stitches in between each stitch in the chain 1 gap spaces. Join with a slst to the first puff stitch. (12 sts)

Round 3: Make 1 pf stitch in the first ch 1 gap space, make 2 pfs in the next space. *Make 1 pf stitch in the next ch 1 gap space, make 2 pfs in the next space. Repeat from * and join with a slst. (18 sts)

Round 4: Make 1 pf stitch in the first 2 ch 1 gap spaces, make 2 pfs in the next space. *Make 1 pf stitch in the next 2 ch 1 gap spaces, make 2 pfs in the next space. Repeat from * and join with a slst. (24 sts)

Round 5: Make 1 pf stitch in the first 3 ch 1 gap spaces, make 2 pfs in the next space. *Make 1 pf stitch in the next 3 ch 1 gap spaces, make 2 pfs in the next space. Repeat from * and join with a slst. (30 sts)

Rounds 6-14: Make 1 pf stitch into each ch 1 gap space. Join with a slst to complete each round. (30 sts)

Round 15: Ch 1. Sc into first pf stitch (place stitch marker), sc into ch 1 gap space. *Sc into the next stitch, sc into the next ch 1 gap space. Repeat from *. Do not join, continue working in spiral. (60 sts)
Rounds 16-18: Sc into every stitch. Once you have reached the stitch marker on the 18th round, slst into the next 2 stitches to finish up the round.

Bind off and weave in your ends.

Adult Large

Round 1: Ch 3 and join to form a ring. Make 6 Pf stitches in center of ring. Join with the top two loops of the first puff stitch with a slst.

Round 2: Make 2 pf stitches in between each stitch in the chain 1 gap spaces. (12 sts)

Round 3: Make 1 pf stitch in the first ch 1 gap space, make 2 pfs in the next space. *Make 1 pf stitch in the next ch 1 gap space, make 2 pfs in the next space. Repeat from * and join with a slst. (18 sts)

Round 4: Make 1 pf stitch in the first 2 ch 1 gap spaces, make 2 pfs in the next space. *Make 1 pf stitch in the next 2 ch 1 gap spaces, make 2 pfs in the next space. Repeat from * and join with a slst. (24 sts)
Round 5: Make 1 pf stitch in the first 3 ch 1 gap spaces, make 2 pfs in the next space. *Make 1 pf stitch in the next 3 ch 1 gap spaces, make 2 pfs in the next space. Repeat from * and join with a slst. (30 sts)

Round 6: Make 1 pf stitch in the first 4 ch 1 gap spaces, make 2 pfs in the next space. *Make 1 pf stitch in the next 4 ch 1 gap spaces, make 2 pfs in the next space. Repeat from * and join with a slst. (36 sts)

Rounds 7-15: Make 1 pf stitch into each ch 1 gap space. Join with a slst to complete each round. (36 sts)

Round 16: Ch 1. Sc into first pf stitch (place stitch marker), sc into ch 1 gap space. *Sc into the next stitch, sc into the next ch 1 gap space. Repeat from *. Do not join, continue working in spiral. (72 sts)

Rounds 17-19: Sc into every stitch. Once you have reached the stitch marker on the 18th round, slst into the next 2 stitches to finish up the round.

Bind off and weave in your ends.

miercuri, 6 septembrie 2017

Baby Cardigan Pattern

Baby Cardigan Pattern


Size: 24 months.
Finished Measurements:  24” chest circumference

Gauge: 6 stitches and 8 rows = 1” in stockinette
Requirements:  
- Circular or straight needles, size 3.75 mm Double-pointed needles, size 3.75 mm (optional) ;
- Sport weight yarn : MC (300-450 yards), secondary colors A (less than 100 yards), B, and C (less than 50 yards each) ;
MC= light brown
 A= blue
B=navy blue
C= red
- Two stitch holders.;
- zipper;
- Tapestry needle;

Abbreviations used in this pattern:

m1 (make one stitch (one increase)): my favorite way to make a stitch is to lift up and knit the right leg of the stitch one row below the stitch on the left needle.  Another option is to pick up the bar between stitches and knit it through the back loop.

 K = knit
P = purl
RS = right side
WS = wrong side
PM = place marker
SSK = slip two stitches knitwise, then knit these two stitches together through the back loops
K2tog = knit two stitches together

Directions: 
Yoke 
With MC, cast on 85 stitches. 
Work 7 rows of k1, p1 ribbing. 
Work one row purl. Switch to A and work two rows stockinette. In next row, increase  20 stitches evenly across row as follows: k 4, *m1, k 4, rep. from * 18 times, m1, k 5.   ( 105 st.) 
Work 1 more row stockinette. In next row, increase 28 stitches evenly across row as follows: k 12, *m1, k3, rep. from * 26 times, m1, k 12.   ( 133) st. 
 Body 
In next RS row, divide for sleeves as follows: 
knit to first marker, place stitches between first and second markers on a holder or piece of scrap yarn, knit to third marker, place stitches between third and fourth markers on a holder or piece of scrap yarn, knit to end. 
You can drop the markers in this row.  
Continue body in stockinette until it measures  11 inches from cast-on. 
Then work 12 rows of k1, p1 rib and bind off. 
Sleeves 
Place one sleeve’s stitches back on needles and rejoin MC yarn. 
Work back-and-forth or in the round.  
If you work back-and-forth, cast on one selvedge stitch at each side to use for seaming up later. 
Work 12 rows stockinette. 
In next row/round (RS), k1, ssk, work to 3 stitches before end, k2tog, k1. 
Work 11 more rows/rounds. 
Repeat these 12 rows/rounds 3 more times. 
Work  8 more rows/rounds stockinette. 
Sleeve should be  7 inches from armpit. 
If it is not, continue in stockinette until it is.  
In next row/round, *k4, k2tog, repeat from * to end.  
Work 8 rows k1, p1 rib and bind off. 
Repeat with other sleeve. 

Sew openings under sleeves.


sâmbătă, 5 august 2017

Simboluri, abrevieri crochet , romana, engleza , germana, franceza, italiana, spaniola

Simboluri, abrevieri crochet

THE SYMBOLS

I
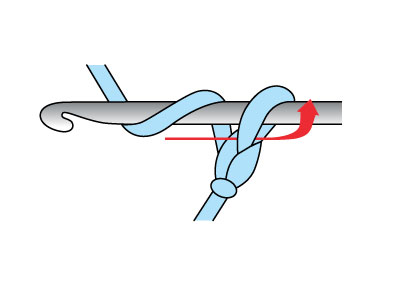
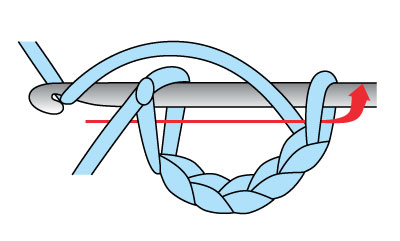
Ochi de lant : "Firul de lucru se infasoara pe degetul aratator de la mana stanga. La capatul firului se face o bucla ale carei extremitati se tin intre degetul mare si cel mijlociu de la mana stanga. Firul care vine de pe deget la bucla trebuie sa fie deasupra iar capatul lui dedesubt. Croseta se tine in mana dreapta. Se introduce croseta prin fata buclei, se ia firul pe croseta (1 jeteu) si se trece prin bucla, fixand astfel primul ochi de lant. * Se ia din nou firul pe croseta (jeteu) si se trece prin primul ochi, formandu-se astfel al doilea ochi de lant * Se repeta de la * la * pana la obtinerea numarului de ochiuri de lant necesar modelului ce urmeaza a se executa, acestea formand randul, (lantul ) de baza". (Conform "303 Modele de crosetat si tricotat" de Doina Silvia Marian),
Este simbolizat de un mic oval.

SymbolChain
U.S.chain (ch)
U.K.chain
Françaismaille en l´air
Españolcadeneta (cad)
DeutschLuftmasche (Lftn)
Italianopunto catenella
Symbol Crochet


Piciorusul orb sau ochi alunecat:  se introduce croseta in locul unde prevede modelul,  se ia firul pe croseta  si se trage prin ambele ochiuri.
Este simbolizat de un punct sau jumatate de cerculet.


SymbolSlip Stitch
U.S.slip stitch (sl st)
U.K.slip stitch (sl st)
Françaismaille coulee
Españolpunto enano (pe)
DeutschKettmasche
Italianomaglia bassissima

Symbol Crochet

 Piciorus mic -  se introduce croseta intr-un ochi al lantului de baza sau in punctul dorit, se ia firul si se scoate o bucla , dupa care, se ia un jeteu si se trece firul prin cele 2 bucle aflate pe croseta .
Este simbolizat de un x.


SymbolCrochet
U.S.single crochet (sc)
U.K.double crochet (dc)
Françaismaille serree
Españolpunto bajo (pb)
DeutschFeste Masche (fM)
Italianomaglia bassa (m. bassa)
Symbol Crochet

Piciorus mare redus – se lucreaza dand firul o singura data dupa croseta ,  introducem croseta intr-un ochi al lantului de baza sau in punctul dorit, se ia firul si se scoate o bucla , dupa care, se ia un jeteu si se trece firul prin cele 3 bucle aflate pe croseta .
Este simbolizat de un T mare.


SymbolHalf Double
U.S.half double crochet (hdc)
U.K.half treble (htr)
Françaisdemi-bride (demi-br)
Españolpunto alto (pa)
DeutschHalbe Stäbchen (h.Stb)
Italianomexxa maglia alta
Symbol Crochet
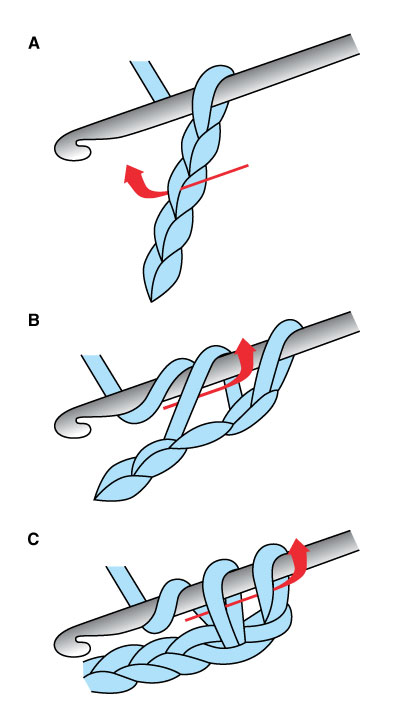
Piciorus mare dublu – se lucreaza dand firul o singura data dupa croseta, introducem croseta intr-un ochi al lantului de baza sau in punctul dorit, se ia firul si se scoate o bucla , dupa care, se ia un jeteu si se trece firul prin primele 2 bucle, luam 1 jeteu  si trecem firul prin urmatoarele 2 bucle.
Este simbolizat de un T mare taiat odata.


SymbolDouble
U.S.double crochet (dc)
U.K.treble (tr)
Françaisbride (br)
Españolpunto alto doble (pad)
DeutschStäbchen (Stb)
Italianomaglia alta (m. alta)
Symbol Crochet
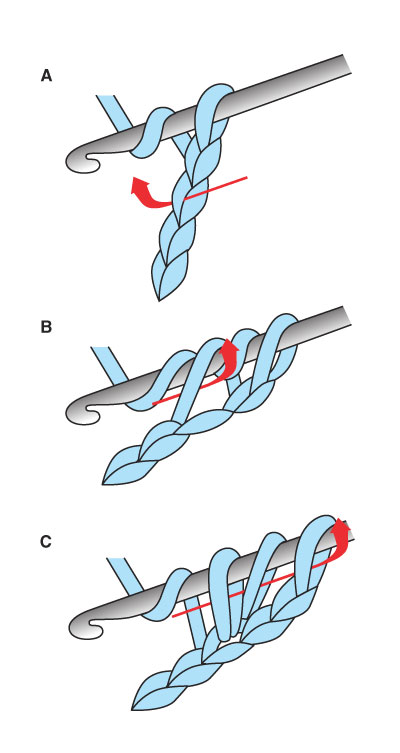
Piciorus mare triplu – se lucreaza dand firul de doua ori dupa croseta, apoi, se introduce croseta in ochiul in care se va realiza piciorusul triplu, se ia firul si se trage o bucla, se ia din nou firul care se trage apoi prin cele 2 bucle de pe croseta, se ia din nou firul care se trage prin urmatoarele 2 bucle de pe croseta si se mai ia din nou firul  care se trage prin ultimele 2 bucle de pe croseta.
Se simbolizeaza cu un T mare taiat de doua ori.


SymbolTreble
U.S.treble crochet (tr)
U.K.double treble (dtr)
Françaisdoulble bride (d-br)
Españolpunto alto triple (pat)
DeutschDoppel-Stäbchen (D.Stb)
Italianomaglia ltissima
Symbol Crochet

Piciorus mare quadruplu -  se lucreaza dand firul de trei ori dupa croseta, se introduce croseta in ochiul in care se va realiza piciorusul quadruplu, se ia firul si se trage o bucla, se ia din nou firul care se trage apoi prin cele 2 bucle de pe croseta, se ia din nou firul care se trage prin urmatoarele 2 bucle de pe croseta, se ia din nou firul care se trage prin urmatoarele 2 bucle de pe croseta  si se mai ia din nou firul  care se trage prin ultimele 2 bucle de pe croseta.
Se simbolizeaza cu un T mare taiat de trei ori.

Picot


Symbolpicot
U.S.picot
U.K.picot
Françaispicot (pi)
Españolpiquito
DeutschPilot (Pi)
ItalianoPippiolino
Symbol Crochet
Cluster

SymbolCluster
U.S.cluster (cl)
U.K.cluster (CL)
Françaisgrappe
Españolpuntos altos cerrados
en el mismo punto
DeutschBüschelmasche
Italianomaglia raggruppata


Symbol Crochet

How to crochet a Magic circle


Abrevieri din limba engleza

BP = Back Post
ch = chain
See this abbreviation used in an example.
chs = chains
cl = cluster
dc = double crochet
dec = decrease
dtr = double treble crochet
FO = finished object
FP = front post
g = gram
half dc = half double crochet
hdc = half double crochet
inc = increase
incl = include / including / inclusive
m = meter; also mesh
p = picot
pat = pattern
PM = place marker / place a marker
pc = popcorn
rep = repeat
rnd = round
rnds = rounds
sc = single crochet
sk = skip
sl st = slip stitch
sp = space
sps = spaces
st = stitch
sts = stitches
tog = together
tr = treble crochet / triple crochet
tr tr = triple treble crochet
UFO = unfinished object
YO = yarn over
* = The pattern will specify how many times to repeat a series of instructions following an asterisk, or between asterisks.
( ) = The pattern will specify how may times to repeat a series of instructions that are given inside the parentheses.
[ ] = The pattern will specify how many times to repeat a series of instructions that are given inside the brackets.
“ = inches

duminică, 16 iulie 2017

Baby Sweater Crochet

Baby Sweater Crochet

SIZE:  0-6 months (12-18 months, 2-3 years, 4 years)
Finished Chest 20 (21, 23, 25) in. (51 (53.5, 58.5, 63.5) cm)
Finished Length 9 1/2 (10, 11, 12) in. (24 (25.5, 28, 30.5) cm)

MATERIALS :
 2 2, 3, 3 Balls • Lion Brand
Crochet Hook - Size I-9 • Large-Eye Blunt Needles (Set of 6) •
Additional Materials 4 buttons, 3/4 in. (19 mm) diameter GAUGE: 14 hdc + 9 rows = 4 in. (10 cm). BE SURE TO CHECK YOUR GAUGE. When you match the gauge in a pattern, your project will be the size specified in the pattern and the materials specified in the pattern will be sufficient. If it takes you fewer stitches and rows to make a 4 in. [10 cm] square, try using a smaller size hook or needles; if more stitches and rows, try a larger size hook or needles.

STITCH EXPLANATION:
hdc2tog (hdc 2 sts together) Yarn over, insert hook into st and draw up a loop.
Yarn over, insert hook into next st and draw up a loop. Yarn over and draw through all 5 loops on hook - 1 st decreased.

BACK

Ch 38 (40, 43, 45).
Row 1: Hdc in 3rd ch from hook and in each ch across - 36 (38, 41, 43) hdc at the end of this row. Row 2: Ch 2 (does not count as a st), turn, hdc in each st across.
Rep Row 2 until piece measures 4 1/2 (5, 5 1/2, 6) in. (11.5 (13, 14, 15) cm) from beg.
Shape Raglan Armholes
Next Row: Ch 2, turn, hdc2tog, hdc in each st across to last 2 sts, hdc2tog - 34 (36, 39, 41) hdc at the end of this row.
Rep last row until 10 (12, 13, 13) sts rem.
Fasten off.

LEFT FRONT
Ch 21 (22, 23, 24).
Row 1: Hdc in 3rd ch from hook and in each ch across - 19 (20, 21, 22) hdc at the end of this row. Row 2: Ch 2 (does not count as a st), turn, hdc in each st across.
Rep Row 2 until piece measures 4 1/2 (5, 5 1/2, 6) in. (11.5 (13, 14, 15) cm) from beg.
Shape Raglan Armhole
Next Row (RS): Ch 2, turn, hdc2tog, hdc in each st across - 18 (19, 20, 21) hdc at the end of this row. Next Row: Ch 2, turn, hdc in each st across to last 2 sts, hdc2tog - 17 (18, 19, 20) hdc.
Rep last 2 rows until 6 (7, 7, 7) sts rem.
Fasten off.

RIGHT FRONT
Ch 21 (22, 23, 24).
Row 1: Hdc in 3rd ch from hook and in each ch across - 19 (20, 21, 22) hdc at the end of this row. Row 2: Ch 2 (does not count as a st), turn, hdc in each st across.
Rep Row 2 until piece measures 4 1/2 (5, 5 1/2, 6) in. (11.5 (13, 14, 15) cm) from beg.
Shape Raglan Armhole
Next Row (RS): Ch 2, turn, hdc in each st across to last 2 sts, hdc2tog - 18 (19, 20, 21 hdc.
Next Row: Ch 2, turn, hdc2tog, hdc in each st across - 17 (18, 19, 20) hdc at the end of this row.
Rep last 2 rows until 6 (7, 7, 7) sts rem.
Fasten off.

SLEEVE (make 2)
Ch 32 (32, 34, 36).
Row 1: Hdc in 3rd ch from hook and in each ch across - 30 (30, 32, 34) hdc at the end of this row. Row 2: Ch 2 (does not count as a st), turn, hdc in each st across.
Rep Row 2 until piece measures 3 (3 1/2, 3 1/2, 4) in. (7.5 (9, 9, 10) cm) from beg.
Shape Raglan Armhole
Next Row: Ch 2, turn, hdc2tog, hdc in each st across to last 2 sts, hdc2tog - 28 (28, 30, 32) hdc at the end of this row.
Rep last row until 4 sts rem.
Fasten off.

FINISHING
Sew raglan edges of Sleeves to raglan edges of Back and Fronts.
Sew side and Sleeve seams.

Collar From RS, join yarn with sl st in corner of Right Front neck.
Row 1: Ch 2, work hdc evenly spaced across entire neck edge to Left Front corner.
Row 2: Ch 2, turn, hdc in each st across.
Rep last row until collar measures about 2 1/4 (2 1/4, 2 1/2, 3 1/4) in. (5.5 (5.5, 6.5, 8.5) cm) from beg.
Fasten off.
On Left Front mark positions for 4 buttons.
First should be at Row 1 of collar, remaining buttons should be about 3 1/2 in. (9 cm) apart.
Edging From RS, join yarn with sl st in lower corner of Right Front.
Row 1: Ch 1, work sc evenly spaced up Right Front, around collar and down Left Front, working a ch 5 button loop opposite each button mark.
Fasten off.

Sew buttons to Left Front opposite button loops.
Weave in ends.

ABBREVIATIONS
beg = begin(s)(ning)
ch(s) = chain(s)
hdc = half double crochet
rem = remain(s)(ing)
rep = repeat(s)(ing)
RS = right side
sc = single crochet
sl st = slip stitch
st(s) = stitch(es)


BABY SWEATER CROCHET 2

Base of ch. Work in first stitch
ch3 counts as first dc
Size to fit approx: 20 Inch chest, 6 – 12 month baby
Materials
130 grams of  Red Heart Baby Hugs Yarn
4.50mm crochet hook, 5 Buttons
GAUGE – 5dc & 3 rows measures approx 1 inch
Worked in one piece, starting with yoke.
ch56, 1dc in 4th ch from hook, 1dc in next 6ch, (front), 3dc in next ch, 1dc in next 8ch, (sleeve), 3dc in next ch, 1dc in next 18ch, (back), 3dc in next ch, 1dc in next 8ch, (sleeve), 3dc in next ch, 1dc in next 8ch, (front). Turn (61dc + ch3).
2nd Row – (Inc) ch1, 1sc in base of ch1, * 1trc in next dc, 1sc in next dc, * rpt from * to * to
centre dc on 3dc group, (front) 3dc in dc
rpt from * to * to centre dc on next 3dc group, (sleeve) 3dc in dc
rpt from * to * to centre dc on next 3dc group, (back) 3dc in dc
rpt from * to * to centre dc on next 3dc group, (sleeve) 3dc in dc
1sc in next dc, rpt from * to * to end, working last sc in top of ch3. (front) Turn. (28trc)
3rd Row – (Inc) ch3, * 1dc in each st to 3dc group, 1dc in next dc, 3dc in centre dc on 3dc group, * rpt from * to * to last 3dc group, 1dc in next dc, 3dc in centre dc on 3dc group, 1dc in each st to end. Turn. (77dc + ch3)
Rpt 2nd & 3rd Rows four more times or until 141dc + ch3 remain.
Shape Armholes – ch1, 1sc in base of ch1, * 1trc in next dc, 1sc in next dc, * rpt from * to * across first front to centre dc on 3dc group, 2sc in dc, skip 30dc, (sleeve) 2sc in next dc, rpt from * to * across back to centre dc on next 3dc group, 2sc in dc, skip 30dc, (sleeve) 1sc in each of next 2dc, rpt from * to * to end. Turn. (38trc)
Pattern Row 1 – ch3, 1dc in each stitch to end. Turn. (84dc + ch3)
Pattern Row 2 – ch1, 1sc in base of ch1, * 1trc in next dc, 1sc in next dc, * rpt from * to * to end, working last sc in top of ch3. Turn. (42trc)
Rpt Pattern Rows 1 & 2 six more times until you have 13trc rows worked in all from beginning. Turn.
Next Row – ch1, 1sc in base of ch1, 1sc in each stitch to end. Turn.
Rpt last row twice. DNT after the last row.
Button/Buttonhole Bands – With RS of work facing, working along right hand front edge, work 41sc evenly in row ends along first front edge, 3sc in corner, work 1sc in each ch around neck, 3sc in corner, work 41sc evenly in row ends down second front edge. Turn.
Button Band – ch1, 1sc in base of ch1, work 1sc in each sc to corner. Turn.
Rpt last row once. Fasten off.
Buttonhole Band – Return to opposite front edge, with WS facing and working from neck 
downwards, rejoin yarn to first sc, ch1, 1sc in base of ch1, * ch2, skip 1sc, 1sc in each of next 8sc, * rpt from * to * 3 more times, ch2, skip 1sc, 1sc in remaining sc. Turn. (5 Buttonholes made)
Next Row – ch1, 1sc in base of ch1, 1sc in each sc and ch2 space to end. 
Fasten off.
Sleeves x 2 – With WS facing, rejoin yarn to first dc underarm were you divided for the
armholes, ch3, 1sc in next dc, * 1trc in next dc, 1sc in next dc, * rpt from * to * across the 30dc for sleeve to end, sl st to top of ch3 on beginning of row to make a round. Turn. (14trc)
Row 2 – ch3, 1dc in each st to end, sl st to top of ch3 on beginning of row. Turn. (29dc + ch3)
Row 3 – ch3, 1sc in next dc, * 1trc in next dc, 1sc in next dc, * rpt from * to * to end, sl st to top of ch3 on beginning of row. Turn.
Rpt Rows 2 & 3 five more times. Turn.
Cuff – ch1, 1sc in base of ch, 1sc in next 2st, * dec 1sc (see abbrev) over next 2st, 1sc in each of next 3st, * rpt from * to * to last 2st, dec 1sc over the 2st’s, sl st to first sc on beginning of row. Turn. (24sc)
Next Row – ch1, 1sc in base of ch1, 1sc in each sc to end, sl st to first sc on beginning of row. Turn.
Rpt last row once.
Finishing – Close small gaps under arms, weave in any loose ends of yarn, sew on buttons to correspond with the buttonholes.
Have lots of fun making this knobbly baby cardi and can you please pin it to your Pinterest boards so others will get to see it.
AbbreviationsWS.     Wrong Side
RS.      Right Side
st.       Stitch(es)
ch.      Chain
sc.       Single Crochet
dc.      Double Crochet
trc.     Treble Crochet
rpt.     Repeat
sl st.   Slip Stitch
yo.      Yarn Over
DNT.  Do Not Turn
dec.   Decrease
Pull up loop from each of next 2st, yo, pull through all loops

joi, 29 iunie 2017

Knitted Hat


MATERIALS:
-          Yarn phildar Quietude (100 gr= 180 m)- 50% wool, 50% acrylic, more colors;
-      5 double pointed Needles  US 3  (3, 25 mm) or size needed to obtain  gauge(also you can use circular  needles).
-      Stitch marker.
Gauge
 12 sts / 19 rows = 5 cm/ 5 cm (2””/ 2”)       
      SIZE:
-          3- 6-12 months (16” head circumference= approx 42 cm);
-          12 – 24 months (18” head circumference= approx 45 cm)
ABBREVIATIONS
-          BO = bind off
-          ch(s) = chain(s)
-          CO = cast on
-          cont = continu(e)(s)(ing)

CO= 17  (23,25) sts, each of the four needels;
Total=92sts , 100 sts
Rows 1-4: k to end;


Using your smaller needles cast on
66(72
)(78)(84)(90), place stitch marker and

join to begin knitting in the round.
Row 5: (k1, k2tog, k8 (9), yo,k1, yo, k8 (9), k2tog, k1) x 4; 92 sts (100 sts)
Row 6:k to end;
Repeat  Rows 5 and 6 ,  more  times (x18).
Next Row : (k1, k2tog, k17 (k19), k2tog, k1) x 4;
Next Row : k to end.
Next Row : (k1, k2tog, k15 (k17), k2tog, k1) x 4;
Next Row : k to end.
Next Row : (k1, k2tog, k13 (k15), k2tog, k1) x 4;
Next Row : k to end.
Next Row : (k1, k2tog, k11 (k13), k2tog, k1) x 4;
Next Row : k to end.
Next Row : (k1, k2tog, k9 (k11), k2tog, k1) x 4;
Next Row : k to end.
Next Row : (k1, k2tog, k7 (k9), k2tog, k1) x 4;
Next Row : k to end.
Next Row : (k1, k2tog, k5 (k7), k2tog, k1) x 4;
Next Row : k to end.
Next Row : (k1, k2tog, k3 (k5), k2tog, k1) x 4;
Next Row : k to end.
Next Row : (k1, k2tog, k1 (k3), k2tog, k1) x 4;
Next Row : k to end.
Next Row : (k1, k2tog x 2) x 4;
Next Row : k12tog.

Bind off

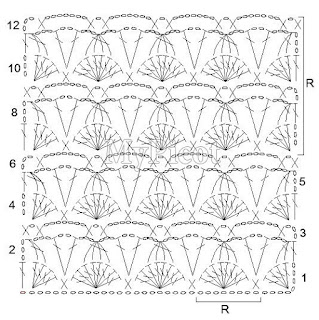
Diagram crochet